The ComputerFox Inc. Formerly Located in Southport CT has moved to Fairfield CT. Our new store is at the Brickwalk and is located in the B level. Our phone numbers are the same and the address is locted at the below link. Please tell your friends.
http://www.mycomputerfox.com/
Other unrelated links
http://www.computerrepairexpert.com/

Tuesday, December 7, 2010
Sunday, December 5, 2010
How To Reset Your Bios Password
There is nothing more annoying than starting up your desktop or laptop computer only to be halted by a password request. Aside from the fact that this slows down your start-up some people do not even remember or know their passwords.
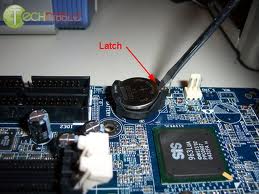 Fortunately BIOS passwords are very often easily fixable. The most obvious way to reset your password is to open up your computer case and locate the battery on the Mother Board. Most of these batteries are going to look like watch batteries (See Photo.)
Before you begin the reset process, be certain you are properly discharged of static electricity and go to work removing the side cover on your computer. Once this is achieved you will have to unplug the computer AC and then remove the BIOS battery. (See photo for most common type.) After removing the battery wait about one minute and then replace the battery the same way it came out. You should then have successfully reset the password and the computer should reboot fine with the defalt Bios Setings. If your Bios Settings did not come up coorectly you can change them by pressing the command that allows you to access the programming page. Us computer techs ge there by looking at the bottom of the computer start-up screen and pressing either one of these usual commands. (Delete (Key) F1 (Key) or the F10 (Key))
 Laptop computers usually work the same way with one very big exception and that is the battery is hard to get to, as it is inside the computer case. If you are not good at taking things apart and putting them back together you may want to call the ComputerFox Inc. in your area to do this for you. However, if you feel brave you will in most cases find the battery either wrapped in plastic with a red and black pigtail on it attached to the mother board, or in some rare cases it may look like a desktop PC battery or be a small watch battery on the motherboard. In either case the method of resetting the password is the same, disconnect the internal battery, AC power and DC Power pack. Wait a minute put the power sources back in and this should fix the problem on your next start up.
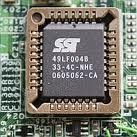 If this did not fix the problem, as in the case of many IBM high security laptops you will have to contact the vendor of that laptop for specific instructions on how to create a jumper circuit to over-ride the BIOS password. (See photo for an example.) Some units also have removable bios chips, these chips can be affordably removed and replaced if they are in ZIF sockets like the one featured in the photo (Left.)
As a final note some motherboards and laptops may not have removable batteries, in those cases you may need to do some research to find the appropriate jumpers to reset the password.
Jumper Circuit Example:

Fortunately BIOS passwords are very often easily fixable. The most obvious way to reset your password is to open up your computer case and locate the battery on the Mother Board. Most of these batteries are going to look like watch batteries (See Photo.) Before you begin the reset process, be certain you are properly discharged of static electricity and go to work removing the side cover on your computer. Once this is achieved you will have to unplug the computer AC and then remove the BIOS battery. (See photo for most common type.) After removing the battery wait about one minute and then replace the battery the same way it came out. You should then have successfully reset the password and the computer should reboot fine with the defalt Bios Setings. If your Bios Settings did not come up coorectly you can change them by pressing the command that allows you to access the programming page. Us computer techs ge there by looking at the bottom of the computer start-up screen and pressing either one of these usual commands. (Delete (Key) F1 (Key) or the F10 (Key))
 If this did not fix the problem, as in the case of many IBM high security laptops you will have to contact the vendor of that laptop for specific instructions on how to create a jumper circuit to over-ride the BIOS password. (See photo for an example.) Some units also have removable bios chips, these chips can be affordably removed and replaced if they are in ZIF sockets like the one featured in the photo (Left.)
As a final note some motherboards and laptops may not have removable batteries, in those cases you may need to do some research to find the appropriate jumpers to reset the password.
Jumper Circuit Example:
Wednesday, December 1, 2010
How To Upgrade Your Processor
Most processors are very upgradeable. The first thing I do when upgrading a processor is to identify the chip itself. To get to the chip, you must open up the case or laptop. The processor usually generates a whole lot of heat and is more often than not under a large heat sync and fan.
When removing your processor, be very careful not to damage it! The most common way a processor is damaged is by the bending of the very soft pins on the legs. It is also important to know that many processors are "keyed" or in other words only fit one way. It is therefore very important not use force when inserting a new processor. It should just gently fall into its socket with minimal effort.
Once you have located the processor inside your computer, you will then need to remove the screws that hold the heat sync down, the heat sync uses a heat compound that is in many cases white or silver in color. It is not uncommon to see the processor stuck to the heat sync when the processor is removed. If the chip is attached, just gently pry it off with a flat head screw driver.
 In order to identify what the upgrade chip is, you will need to clean off the heat compound from the surface of the chip. I personally like to use WD40, but you can pretty much use any cleaning method that does not corrode the chip. Once the chip is clean you will notice numbers printed on the surface of the chip. These numbers may read 1.6GHZ/256/400/1.75v. These numbers are also preceded by the manufacturer name and the serial number. In my particular case since I am upgrading to a faster CPU the one I am replacing it with is 2.1GHZ/256/400/1.75v. I simply remove the old chip, and put the new one in the place where the old one was. There is also a small lever arm hat must be lifted to the top to open the "Zif socket" and pushed completely down and snapped in place to lock the "zif socket."
 Once the chip is replaced, use some quality thermal heat compound like Arctic Silver, reattach the heat sink screw it down and then fire up the computer. If you get a picture on the screen you have done everything correctly. If you do not get a picture on the screen it is possible that you need to check the specs on you mother board for jumper configurations and chip speed compatibility.
When removing your processor, be very careful not to damage it! The most common way a processor is damaged is by the bending of the very soft pins on the legs. It is also important to know that many processors are "keyed" or in other words only fit one way. It is therefore very important not use force when inserting a new processor. It should just gently fall into its socket with minimal effort.
Once you have located the processor inside your computer, you will then need to remove the screws that hold the heat sync down, the heat sync uses a heat compound that is in many cases white or silver in color. It is not uncommon to see the processor stuck to the heat sync when the processor is removed. If the chip is attached, just gently pry it off with a flat head screw driver.
 Once the chip is replaced, use some quality thermal heat compound like Arctic Silver, reattach the heat sink screw it down and then fire up the computer. If you get a picture on the screen you have done everything correctly. If you do not get a picture on the screen it is possible that you need to check the specs on you mother board for jumper configurations and chip speed compatibility.
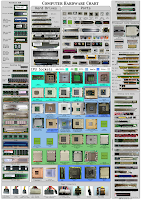
This jumper issue is an unlikely problem since most motherboard are "plug and play" making jumpers obsolete. If you are not certain of your socket type please double click the photo alongside this post and match it up.
For an instructional video see the one below embedded from YouTube.
Thursday, November 18, 2010
How To Upgrade Your Ram
Upgrading the Ram in your computer is fast safe and easy when you take precautions. The first thing you need to do is figure out what memory you need. Before spending money or ordering anything you should know that just because the memory looks like it fits it does not mean you have the right memory.
To figure out what memory you need you must first take static precaution by discharging any static electric on yourself. Do this by touching something metal that is grounded. Once you are discharged, turn off your computer, laptops should be unplugged and the battery removed. Now get a screw driver that will not strip the screws and locate the location of your memory chips. On desktops they will be inside the computer itself requiring you to open the computer case. On laptops they will be behind a panel or under the keyboard. If you are unsure where to find your memory chips than look it up on the Internet or read your manual.
 Once you locate your memory chips, you can safely remove them as long a the computer is off. On the chips you will see a tag or sticker. That sticker will contain some key numbers to match the memory you need. Aside from the chip fitting matching the speed is also important.
If you do not have an available slot, you will need to replace a memory chip with a higher capacity one. Some of these chips might be in banks and require terminators. If you have terminators like BusRam has you must place identical chips in each bank, and reinsert the terminators in the empty banks.
Once the new memory has been added, or replaced the smaller chips, the final part of your job is going to be absolutely certain that the chips snapped down into the slot and are firmly in place. Not doing so will cause the computer to not start and beep at start up. It could also cause the computer to not register the added memory. So please be absolutely certain that the memory has been inserted correctly. Lastly check to make sure that you did not unplug any other cables belonging to other devices while working in the computer.
If you feel certain that you got it all right, at this point you may plug in and start up the computer. Some computers will post a message at startup that the "Memory amount has changed" this is usually a good sign and if the amount is the total amount in all the slots that is a great success. Turn off the machine screw it back together and you are finished. If that did not happen, you may enter the computer BIOS by hitting Usually Del, F1, F2, or an associated keyboard command and check the memory in the Bios. If all else fails and your computer booted into Windows just use your mouse, point your cursor over the My Computer Icon on the Desktop, right click and go to properties. There you will see how much memory is installed in your system. Mac's can also achieve this with a similar menu command.
Adding Ram to your computer can dramatically improve its performance, especially if you have less than 600Mb for Windows XP, 2 GB for Vista, or Windows 7. Newer operating system may require more.
Hope this helped. If not call us and we will have your memory professionally installed for you at one of our locations. (203) 254-3526.
Video Laptop Memory Install
Video Desktop Memory Install
http://www.mycomputerfox.com/
To figure out what memory you need you must first take static precaution by discharging any static electric on yourself. Do this by touching something metal that is grounded. Once you are discharged, turn off your computer, laptops should be unplugged and the battery removed. Now get a screw driver that will not strip the screws and locate the location of your memory chips. On desktops they will be inside the computer itself requiring you to open the computer case. On laptops they will be behind a panel or under the keyboard. If you are unsure where to find your memory chips than look it up on the Internet or read your manual.

If you do not have an available slot, you will need to replace a memory chip with a higher capacity one. Some of these chips might be in banks and require terminators. If you have terminators like BusRam has you must place identical chips in each bank, and reinsert the terminators in the empty banks.
Once the new memory has been added, or replaced the smaller chips, the final part of your job is going to be absolutely certain that the chips snapped down into the slot and are firmly in place. Not doing so will cause the computer to not start and beep at start up. It could also cause the computer to not register the added memory. So please be absolutely certain that the memory has been inserted correctly. Lastly check to make sure that you did not unplug any other cables belonging to other devices while working in the computer.
If you feel certain that you got it all right, at this point you may plug in and start up the computer. Some computers will post a message at startup that the "Memory amount has changed" this is usually a good sign and if the amount is the total amount in all the slots that is a great success. Turn off the machine screw it back together and you are finished. If that did not happen, you may enter the computer BIOS by hitting Usually Del, F1, F2, or an associated keyboard command and check the memory in the Bios. If all else fails and your computer booted into Windows just use your mouse, point your cursor over the My Computer Icon on the Desktop, right click and go to properties. There you will see how much memory is installed in your system. Mac's can also achieve this with a similar menu command.
Adding Ram to your computer can dramatically improve its performance, especially if you have less than 600Mb for Windows XP, 2 GB for Vista, or Windows 7. Newer operating system may require more.
Hope this helped. If not call us and we will have your memory professionally installed for you at one of our locations. (203) 254-3526.
Video Laptop Memory Install
Video Desktop Memory Install
http://www.mycomputerfox.com/
Subscribe to:
Posts (Atom)